Sold out. Don't you hate those words? I found an adorable, reasonably priced chevron striped top, (very popular pattern this season) and immediately added it my shopping cart. My downfall was browsing the site to see what else was new in the fashion world. Those side links are seductive. When I was ready to check out, well, you know what happened...Typical.
 I've read a few DIY blogs and articles for both the home and fashion. Most of these projects focus on how to get a more affordable (cheaper) version of higher end items. But what if you found something that was already affordable, just not available? In my case, I decided to make my own chevron top. Isn't it cute? Before proceeding, you should know that I absolutely, positively cannot sew. Can. Not. What I can do is paint. Here's how I did it.
-- As you can see, the original top was a black and white top with a sweetheart neckline and I wanted to get as close as possible to that. To make this particular chevron pattern, I started with a white v-neck tank top. In my case, I had access to a life size mannequin, but if you don't have that just lay the tank on a flat surface and get it as smooth as you can.
-- Next, mark the center of the shirt. Having a v-neck made it easier to find the center, so I put tiny pencil mark for my start point and ending point. Using the painter's tape, I marked the rest of the tank down the center. I was now ready to start patterning one side of my tank.
-- Decide the width of your stripes. Since I already had 2" painter's tape, I decided to go with that.
-- I used of slope of the neckline to decide the angle of my stripes. Even though the top of the tank would be painted, I taped the very top of the tank just to get the right width and use as a guide for my stripe. Having that should keep you pretty consistent. Then I proceeded to tape my chevron pattern from side seam to the center of the tank.
-- Once all was done on one side, I slightly repositioned my center tape, and repeated the steps for the other side. Make sure you angles line up. It may take a few adjustments. Total time for me was about 30 min.
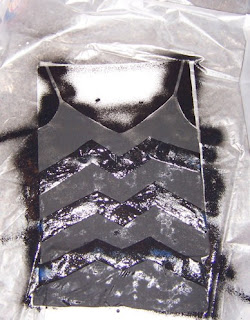
-- I used an extra canvas inside of the tank top to prevent bleeding, but you can use cardboard. You're almost ready to paint!
-- Shake can well.
-- When you're ready, DO NOT start spraying directly onto the shirt. Start a little past the shirt and spray continuously. Be careful! Try to cover all areas. If you go back for spot corrections, it will not dry right.
-- Let dry.

Although my top dried, it still smelled like spray paint. As per the instructions, I left it alone for 72 hrs before I washed it. Because I'm overly cautious, I handwashed it. There were a couple of bleed marks where the tape didn't meet, but I can live with them. What do you think? Close enough?


You are in a chevron phase, too! What an ingenious way to create the Sold Out chevron top!! Great job.
ReplyDeleteWow! I don't think I could do that. Great job! Looks awesome. =)
ReplyDelete~Kim
http://2justByou.blogspot.com
I would never have thought of that! (Mostly because I didn't know about fabric paint...) It looks great! :)
ReplyDeleteThank you for the great advice of how to paint fabric! Every item is a OOAK item!
ReplyDelete